- Hyland Connect
- Platform
- Alfresco
- Alfresco Blog
- Customizing the Alfresco document list
- Subscribe to RSS Feed
- Mark as New
- Mark as Read
- Bookmark
- Subscribe
- Printer Friendly Page
- Report Inappropriate Content
 Before diving deep in the technical topic, let’s start from the beginning, seeing how Alfresco Content service provider works with an existing ADF application. To reach the goal, we are going to use a brand new environment for the next discussions and development. Before discussing the technical stuff, please check the disclaimer for versions, requirements and further details. In particular we assume you have:
- An Alfresco Content Services instance up and running. You can refer to the official documentation for further details on how to install Alfresco into various Operating Systems (Linux and Windows based).
- An existing Alfresco ADF application, called
my-adf, created exactly in the same way it is described into the ADF 101 Getting started tutorial.
Once you environment is up and running, let’s see how the my-adf application shows the Alfresco repository and some further details about the ng2-alfresco-documentlist components. After this, we are going to develop some customizations to see in practice how to control their behaviour. As usual, we are going to use a “step by step” description of each task, assuming you are quite familiar with Alfresco content services and ADF architecture and principles.
The content services of an ADF application
If you are familiar with Alfresco ECM, what you are going to see in this paragraph will be very similar with what you already know. In particular we are going to see how the my-adf application shows the Alfresco repository, using the Angular components provided by ng2-alfresco-documentlist.
Assuming you have the my-adf application up and running, created in the same way it is described in the ADF 101 tutorial, let’s see how the home page looks like, once you successfully login.
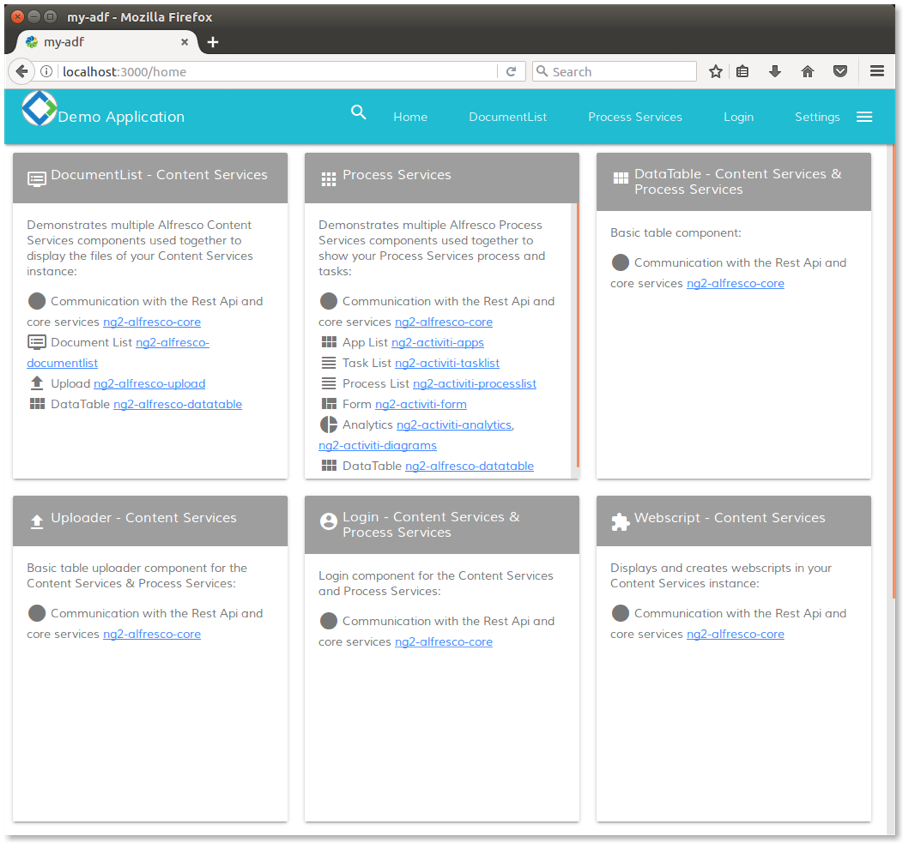
Home page of my-adf application.
Let’s click on the DocumentList - Content Services content or on the DocumentList item in the upper menu, to access to the content service view. As you can see, the view shows the repository, similarly on what you probably use in Alfresco Share. By default you land into the user home, as shown in the picture below. Diving into the repository structure using the breadcrumb, a classical tree structure will be easily available for your discovery.
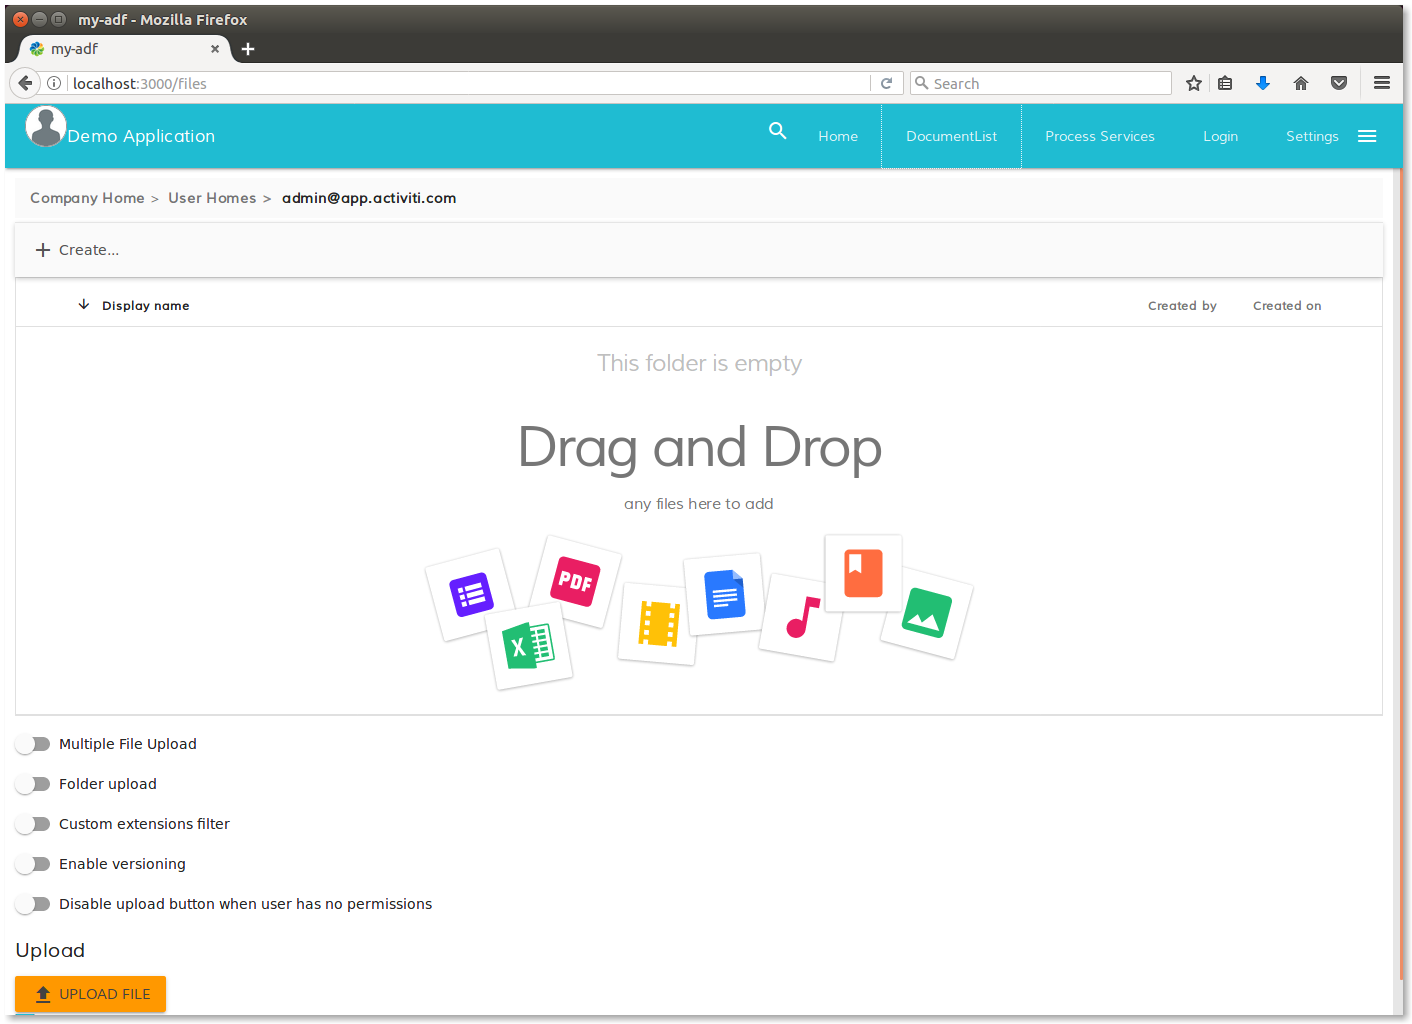
Content service view into the my-adf application.
Starting from the top of the view, we can recognize: the upper menu in cyan, the repository breadcrumb, the repository explorer (with a Create button), some buttons and checkboxes as an example of shortcuts and settings, the upload button. Below we are going to see the technical details behind the view.
As described in ADF 102, behind a view there is always an Angular component. In our specific case, using my-adf application created with the Alfresco App Generator, the involved component is called files and it is stored into the <my-adf>/app/components/files path.
This component is a good example of how a content management can be developed using ng2-alfresco-documentlist, ng2-alfresco-viewer and ng2-alfresco-upload. It’s up to you to modify the behaviour for a different rendering or a different management. Everything depends on your specific use case and your specific needs and requirements.
As we learnt in the ADF 102 tutorial, the presentation layer of the component is managed into the files.component.html file (together with the css file) and the business logic is managed into the files.component.ts file. Taking a look at the HTML file, you can discover other related components, represented in the HTML content by the specific tags listed below.
// Defines a drag area to upload content into Alfresco.
// Included intong2-alfresco-upload.
<alfresco-upload-drag-area ... >
// Shows the Alfresco breadcrumb.
// Included intong2-alfresco-documentlist.
<alfresco-document-list-breadcrumb ... >
// Shows the Alfresco repository.
// Included intong2-alfresco-documentlist.
<alfresco-document-list ... >
// Shows the pagination for the Alfresco repository component.
// Included intong2-alfresco-documentlist.
<alfresco-pagination ... >
// Shows the upload button into Alfresco.
// Included intong2-alfresco-upload.
<alfresco-upload-button ... >
// Shows the uploading dialog content.
// Included intong2-alfresco-upload.
<file-uploading-dialog ... >
// Shows the Alfresco viewer of documents.
// Included intong2-alfresco-viewer.
<alfresco-viewer ... >
We won’t treat more than this, the details about the files component. Instead, we would like to focus the description on the customisation of the listed components, as relevant part of ng2-alfresco-documentlist, ng2-alfresco-viewer and ng2-alfresco-upload. For further details, we suggest to take a look into the Alfresco Catalog or check into the Community of Developers dedicated to the Alfresco ADF.
Customizing the ng2-alfresco-documentlist
As described above in the document, the ng2-alfresco-documentlist has been designed to show (and interact with) the Alfresco documents and folders. The components alfresco-document-list-breadcrumb and alfresco-pagination are very easy to use and customize, so we are going to concentrate the examples on the alfresco-document-list. Below the list of examples we are going to describe.
- Adding new columns to the
alfresco-document-listview. In this example we are going to modify the repository view with a new column.
- Customising the folder and document actions into the
alfresco-document-listview. In particular discussing how to change the behaviours.
- Describing how the interaction between content (documents and folders) and processes (Alfresco Process Services processes) could work using the actions.
Below we are going to describe each example in a paragraph with a “step by step” description of how to develop the customisations, starting from the my-adf application.
Adding new columns to the alfresco-document-list view
Looking at the files component stored into the <my-adf>/app/components/files folder, let’s edit the files.component.html file and find the alfresco-document-list tag. As you can see, the HTML tag contains some HTML source code and in particular the tags listed below:
empty-folder-contentdescribing the HTML content to be showed to the users, in case of empty folder. This bunch of HTML content is commented by default.
data-columnslisting the data columns displayed for folders and documents.
content-actionslisting the actions related to folders and/or documents.
For a full list of supported tags, the alfresco-document-menu-action tag should be included and it controls the Create button on top of the view. For further details about this feature please refer to the ng2-alfresco-documentlist documentation.
Back again to our use case, it is quite obvious that we are going to act on the data-columns tag, even if we will use this example to try also the empty-folder-content customization.
As a first task, let’s modify the source code according to what is described below.
<alfresco-document-list ... >

 <!-- Add the content below. -->
 <empty-folder-content>
  <template>
   <h1>Sorry, no content here</h1>
  </template>
 </empty-folder-content>

 <data-columns>
  ...
  <data-column
   title="{{'DOCUMENT_LIST.COLUMNS.DISPLAY_NAME' | translate}}"
   key="name"
   sortable="true"
   class="full-width ellipsis-cell">
   ...
  </data-column>

  <!-- Add the HTML code below. -->
  <data-column
   title="Id"
   key="id">
  </data-column>

 ...
 </data-columns>

 ...
</alfresco-document-list>
Saving the files.component.html file, you will see that the application will be automatically updated. Removing the comments related to the empty-folder-content tag, a custom message is shown in case of empty folder. In the picture below, you can see how the view looks like, in case of an empty folder.
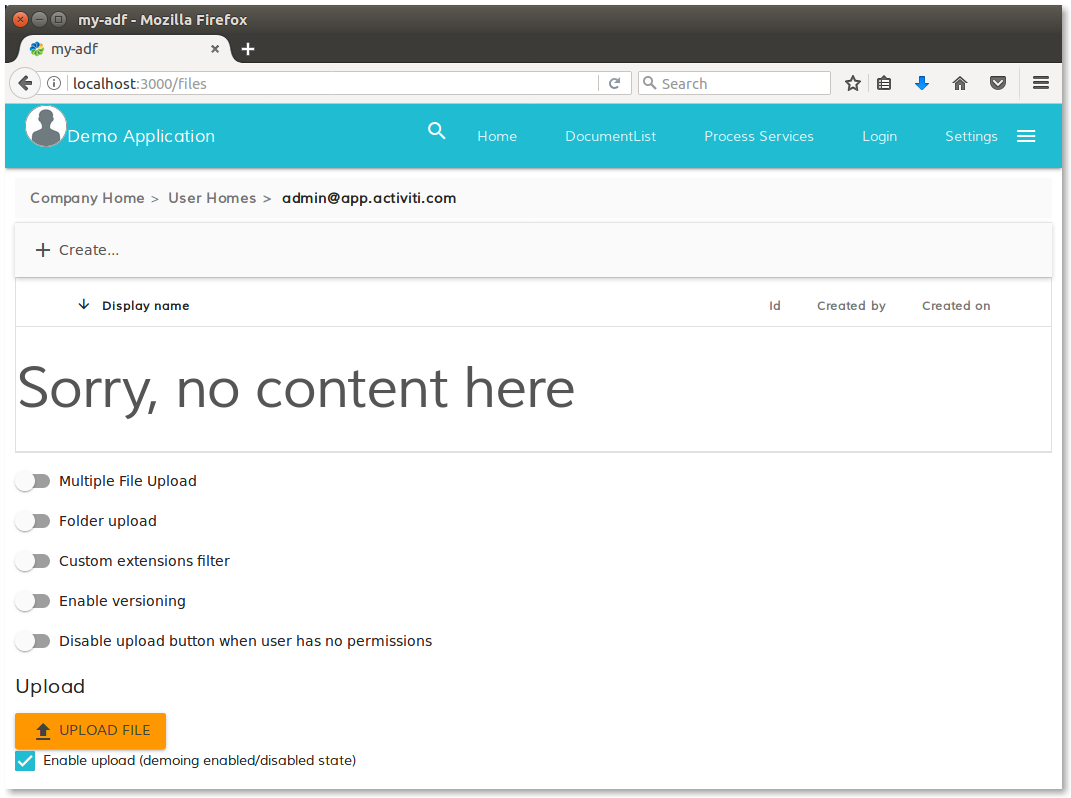
Example of custom message for empty folder, in the alfresco-document-list view of the my-adf application.
Adding the data-column tag, a new custom column containing the Alfresco node identifier is showed into the view. In the picture below, you can see how the view looks like in case of a folder with content. Bordered in red you can find the place where the new column is shown for each folder or document.
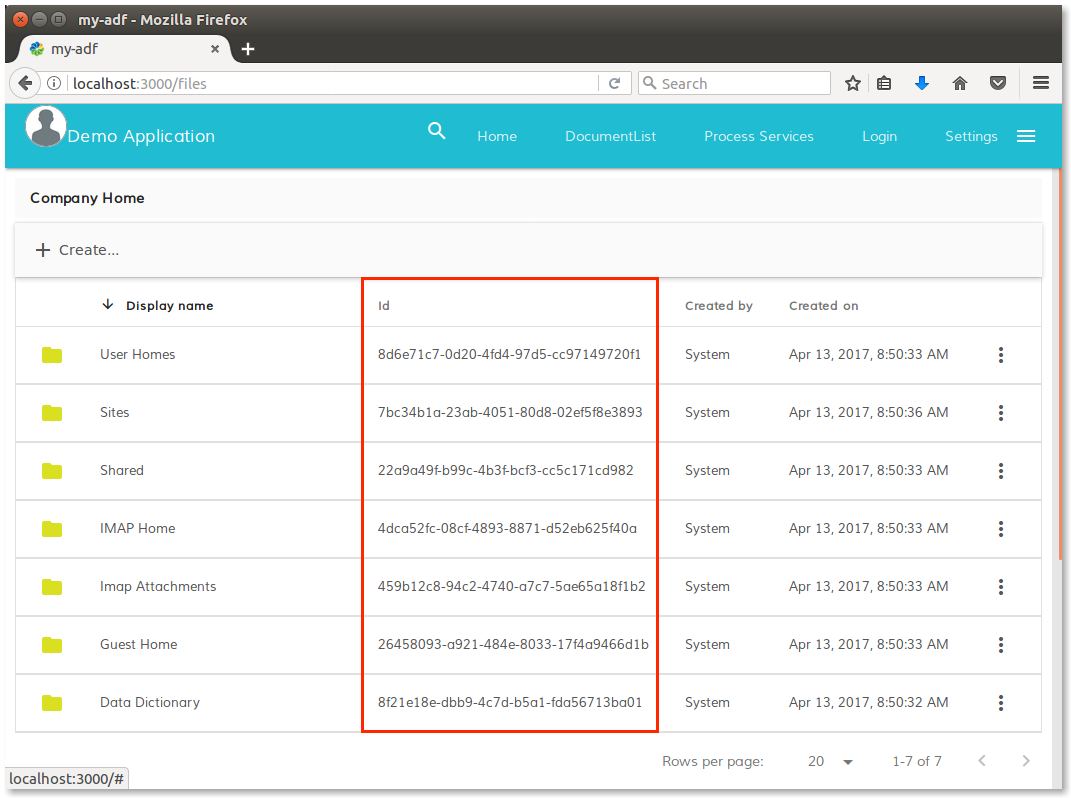
Example of custom column in the alfresco-document-list view of the my-adf application.
For the full list of the attributes supported by the data-column tag, you can refer to the ng2-alfresco-documentlist documentation. To understand the possible values that you can use for the key attribute, please refer to the FileNode and FolderNode classes described into the document-library.model.mock.ts source code. We would like to submit to your attention that you can use nested properties, like for example content.mimeType (filled for documents only).
Customising the folder and document actions into the alfresco-document-list view
Now that we know how the alfresco-document-list tag works into the ng2-alfresco-documentlist components, it’s time to customise the content-actions tag, to control the actions related to folders and documents. Before describing the technical details, let’s define the basis around the actions.
First of all, an action is a function (i.e. a bunch of code) executed on a node (document or folder). The actions can be applied to documents only or folders only. You can identify the actions directly in the view, very easily, clicking the three points icon on the right of each row containing a document or a folder.
To customise the actions on documents and folders, let’s edit again the files.component.html file, according to what is described below.
<alfresco-document-list ... >

 <data-columns>
  ...
 </data-columns>

 <content-actions>
  ...

  <!-- Add the HTML code below. -->

  <content-action
   target="document"
   title="My custom download"
   handler="download">
  </content-action>
  <content-action
   target="folder"
   title="My custom delete"
   handler="delete">
  </content-action>

 </content-actions>

 ...
</alfresco-document-list>
In this example, we are going to add a new action called My custom download for documents only, and a new action called My custom delete for folders only. As described into the ng2-alfresco-documentlist documentation, there two actions provided out-of-the-box:
- Download (for documents only).
- Delete (for documents and folders).
In our example we are going to use both, to test how they work in practice.
Saving the files.component.html file, you will see that the application will be automatically updated. In the picture below, you can see how the view looks like, selecting the actions in a folder.
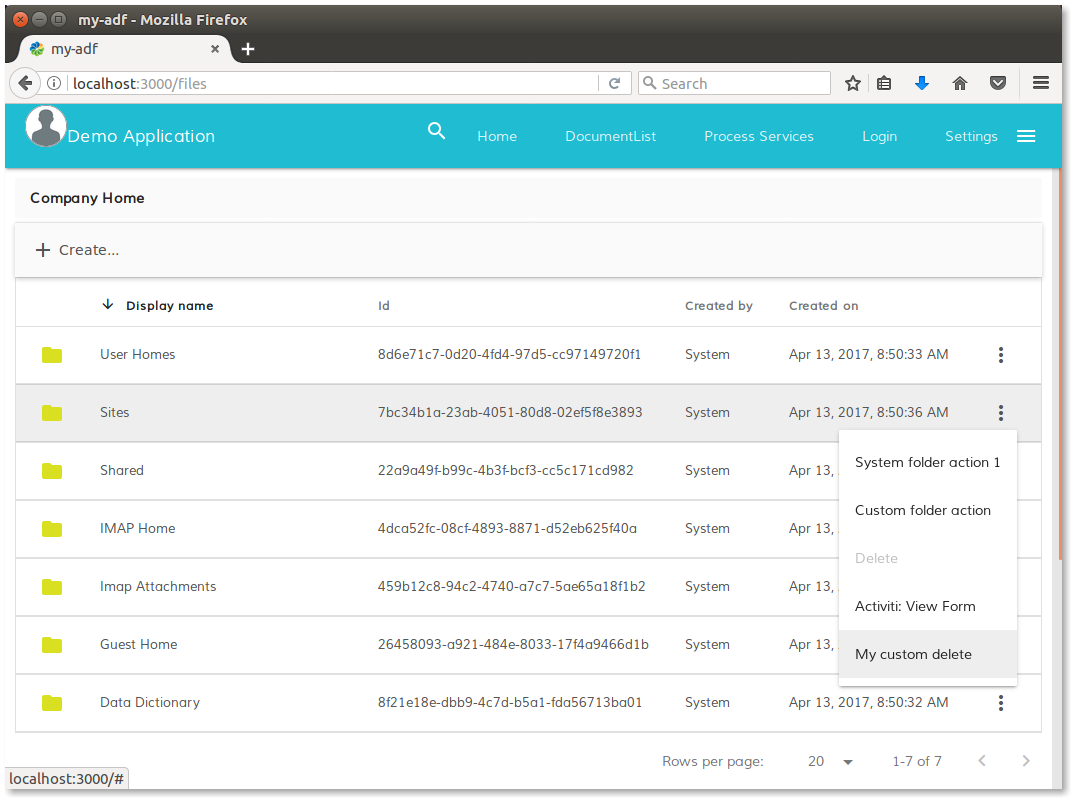
Example of custom action for folders in the my-adf application.
In the example above, we saw how to use an existing handler (i.e. function) into an action, but what to do if we want to implement a specific behaviour with a custom function? The changes are extremely easy: we have to replace the handler attribute in the content-action tag and then declare the function as a method of the TypeScript class representing the hosting component.
To customize the action on folders (for documents is exactly the same), let’s edit again the files.component.html file, according to what is described below.
<alfresco-document-list ... >
  ...
  <content-actions>
    ...
    <content-action
      target="folder"
      title="My custom action"
      (execute)="myFirstFolderAction($event)"> <!-- Modify the description add the attribute. Remove handle. -->
    </content-action>
  </content-actions>
  ...
</alfresco-document-list>
Now that the event points on a custom behaviour, let’s declare the function in the TypeScript component. To declare the class let’s edit the files.component.ts file, according to what is described below.
@Component({
  ...
})
export class FilesComponent implements OnInit {
  ...
  // Add the source code below.
  myFirstFolderAction(event) {
    alert('You clicked on the ' + event.value.entry.name + ' folder.');
  }
  ...
}
Saving the files.component.html and files.component.ts files, you will see that the application will be automatically updated. In the picture below, you can see how the view looks like, selecting the actions in a folder and clicking on My custom action item.
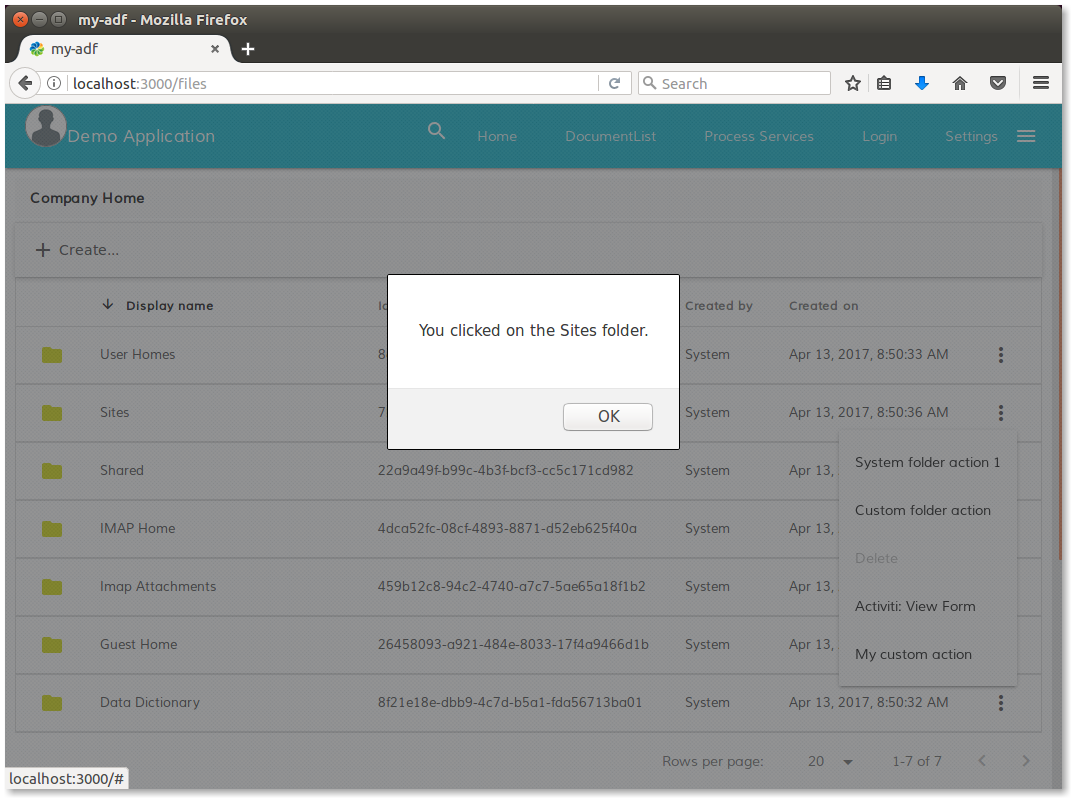
Example of custom action on a custom function for folders in the my-adf application.
Even if those are the most important customizations of the ng2-alfresco-documentlist, please refer to the alfresco-ng2-components GitHub Project and take a look to the Alfresco Catalog, with a friendly (and technical) overview of all the available features. For requests of support, questions and feedback, don’t forget to participate to the Community of Developers dedicated to the ADF or to the Gitter space dedicated to the Alfresco Angular components.
Describing the interaction between content and processes
As last example of customization of the ng2-alfresco-documentlist, let’s see how the files component manages the interaction between a document (or a folder) and the Activiti processes. Before discussing the technical details, let’s share that to see this feature working into your environment, we assume you have an Activiti instance up and running, as described in the disclaimer above in the document.
Once you environment is correctly setup, let’s edit the files.component.ts stored into the <my-adf>/app/components/files folder. As you can see directly in the source code, the ngOnInit method contains the commands below.
...
if (this.auth.isBpmLoggedIn()) { // Check if logged into Activiti.

  // Registering the Alfresco Process Service processes into the actions.
  this.formService.getProcessDefinitions().subscribe(
    defs => this.setupBpmActions(defs || []),
    err => console.log(err)
  );
} ...
Considering that the ngOnInit method is executed every time the files component is initialized, this portion of code is everything we need to dynamically add the list of available Alfresco Process Service processes to the actions of the component. The if condition is useful to add the processes, if and only if the current user is logged in into the BPM system (this.auth is the AlfrescoAuthenticationService object used to manage the systems’ authentication).
To complete the description, let’s see how the setupBpmActions method look like.
private setupBpmActions(actions: any[])

  actions.map(def => {

    // Adding the action to the documents.
    let documentAction = new DocumentActionModel();
    documentAction.title = 'Activiti: ' + def.name;
    documentAction.handler = this.getBpmActionHandler(def);
    this.documentList.actions.push(documentAction);

    // Adding the action to the folders.
    let folderAction = new FolderActionModel();
    folderAction.title = 'Activiti: ' + def.name;
    folderAction.handler = this.getBpmActionHandler(def);
    this.documentList.actions.push(folderAction);
  });
}

private getBpmActionHandler(processDefinition: any): ContentActionHandler {
  return function (obj: any, target?: any) {
    window.alert(`Starting BPM process: ${processDefinition.id}`);
  }.bind(this);
}
As you can see, changing the behaviour of the setupBpmActions method, the processes could be added to documents only or folders only or customized as requested. To complete the description, below you can see how the view looks like in case of an existing My first process APS workflow available.
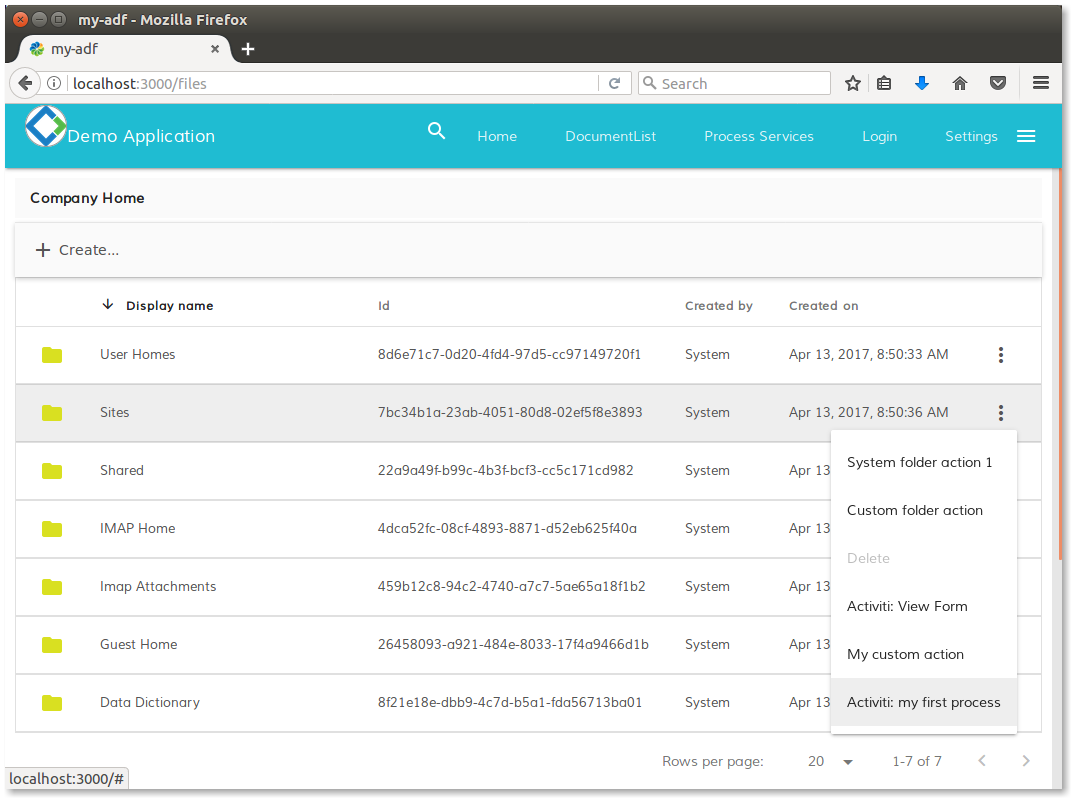
Example of actions interacting with Alfresco Process Service processes in the my-adf application.
You must be a registered user to add a comment. If you've already registered, sign in. Otherwise, register and sign in.
- Help, problem with Digital Signature message, version de Alfresco 6.2 in Alfresco Forum
- Bulk Import in Alfresco Community: content indexed but full-text extraction not working in Alfresco Forum
- Security Advisory: CVE-2025-66516, XXE Exposure in Apache Tika and Its Impact on Alfresco in Alfresco Blog
- November 2025 - Alfresco Customer Newsletter in Alfresco Blog
- Alfresco Community Edition 25.3 Release Notes in Alfresco Blog
