- Hyland Connect
- Content Management
- Alfresco
- Alfresco Blog
- ADF 101 - Getting Started with Alfresco Applicatio...
- Subscribe to RSS Feed
- Mark as New
- Mark as Read
- Bookmark
- Subscribe
- Printer Friendly Page
- Report Inappropriate Content
In this tutorial we are going to see how to create your first responsive application from scratch, using the Alfresco Application Development Framework (from now on named ADF). The Alfresco ADF is provided by Alfresco as Open Source, to build custom applications on top of the Activiti BPM Engine and Alfresco ECM Repository.
We won’t introduce here the basis of the Alfresco ADF, because we would like to focus the content on the creation of your first ADF Project. To better describe the tasks, we are going to use “a step by step“ approach, more practical and easy to follow for our goal. For further details about the Alfresco ADF, please refer to the alfresco-ng2-components GitHub Project and take a look to the Alfresco Catalog, with a friendly (and technical) overview of all the available components. For requests of support, questions and feedback, don’t forget to participate to the Community of Developers dedicated to the ADF or to the Gitter space dedicated to the Alfresco Angular 2 components.
Creating your first application with ADF
Creating your first application with Alfresco ADF is very straightforward, even if you are not an expert into all the requested languages and technologies. Below the complete list of tasks to follow to create your first application with ADF:
1. Service layer setup. In this task you are going to set up Activiti BPM and/or Alfresco ECM as core services for your web application. This task is composed by the sub-tasks listed below.
1.1 Installing Activiti BPM as ADF service layer.
1.1.1 Installing Activiti 1.5.2.1+.
1.1.2 Enabling CORS on Activiti BPM.
1.2 Installing Alfresco ECM as ADF service layer.
1.2.1 Installing Alfresco 5.2+.
1.2.2 Enabling CORS on Alfresco ECM.
1.2.3 Installing REST API Explorer (Optional).
2. Creating an application with ADF. In this task you are going to create your Angular2 application using the Yeoman scaffolder generator.
2.1 Checking the prerequisites into your environment (Node.js).
2.2 Installing Yeoman and the Alfresco App Generator.
2.3 Generating your first Alfresco ADF application.
3. Running and using the application. In this task you are going to run your brand new application for the very first time and to start using it since the beginning.
Below you can find a “step by step” description of each task, assuming you are familiar with the recent web development principles.
1. Service layer setup
In this first task, we are going to set up the core services used as basis from your upcoming application. From an architectural point of view, the application created with Alfresco ADF is a front-end layer, completely decoupled from the back-end layer. The back-end layer is defined by a collection of RESTFul based services, as represented in the following picture.

Fig. 1 - Overview of the architecture of an Alfresco ADF application, with focus on the service layer
In the following sections we are going to see how to install and setup Activiti BPM and Alfresco ECM as service layer for an Alfresco ADF application. Before diving deep in the details of the setup, we would like to underline that it is not mandatory to have both the softwares up and running. Depending on your custom application, you could require to have Activiti BPM only or Alfresco ECM only. In our first application we are going to use both, to see in practice an BPM plus ECM use case.
Using the Alfresco ADF v1.1.0 LA, if both Activiti BPM and Alfresco ECM are used, is requested to have the same credentials for the two systems. With “same credentials” we mean the same users available in Activiti and Alfresco, with the same username and password. For this purpose, we suggest to create a new user with Administrator’s permits into Alfresco with username
admin@app.activiti.comandadminas password (the default Administrator credentials in Activiti).
1.1. Installing Activiti BPM as ADF service layer
Installing Activiti BPM as Alfresco ADF service layer is quite similar to a standard installation, except for few setup and details. There are two main tasks to follow to set up an Activiti BPM service layer:
1.1.1. Installing Activiti 1.5.2.1+. In this task you are going to install a standard configuration of Activiti (from version 1.5.2.1 or more recent).
1.1.2. Enabling CORS on Activiti BPM. In this task you are going to set up the Activiti installation to admit requests from outside the domain.
Below you can find a “step by step” description of each task, assuming you are familiar with Activiti BPM and its fundamentals.
1.1.1. Installing Activiti 1.5.2.1+
In this task you are going to set up a standard instance of Activiti BPM, paying attention to what is described below:
- Activiti Enterprise version 1.5.2.1 or newer has to be used.
The detailed description of the installation of Activiti BPM is out of the scope of this tutorial, considering that the official documentation is complete for Enterprise and Community. If you need support on the Activiti standard installation, please refer to the Community Portal dedicated to the Activiti BPM.
By default Alfresco ECM and Activiti BPM are installed using the port 8080. If you plan to install both the softwares on the same server, please ensure you change one of them to prevent conflicts. For this tutorial, we suggest to maintain Alfresco ECM running on port 8080 and Activiti BPM running on port 9999.
1.1.2. Enabling CORS on Activiti BPM
Now that Activiti is up and running, we need to tell to the server to accept requests coming from the ADF application. The future ADF application will be installed on a different web server and by definition, it will be considered another domain. This can be done by enabling CORS, not admitted by default.
To enable CORS in Activiti, please follow the steps described below.
- Locate the
activiti-app.propertiesfile in the following path <activiti>tomcat/lib.
- Add the following configuration settings to the
activiti-app.propertiesfile.
cors.enabled=true
security.csrf.disabled=true
- Save the file and restart Activiti.
Please note that, by default, the CORS filter will allow any origin. This setup should be developed differently in a production environment, according with the best practices in terms of security over internet.
1.2. Installing Alfresco ECM as ADF service layer
Installing Alfresco ECM as Alfresco ADF service layer is quite similar to a standard installation, except for few setup and details. There are three main tasks to follow to set up an Alfresco ECM service layer:
1.2.1. Installing Alfresco 5.2+. In this task you are going to install a standard configuration of Alfresco (from version 5.2.c or more recent), Alfresco Share is not required for ADF to run, however it may prove useful for administrative tasks.
1.2.2. Enabling CORS on Alfresco ECM. In this task you are going to set up the Alfresco installation to admit requests from outside the domain.
1.2.3. Installing REST API Explorer (Optional). In this task you are going to install a simple web application on top of Alfresco, as reference and documentation of the REST services. This task is optional and will help you for a better comprehension of the available services and how the API works.
Below you can find a “step by step” description of each task, assuming you are familiar with Alfresco ECM and its fundamentals.
1.2.1. Installing Alfresco 5.2+
In this task you are going to set up a standard instance of Alfresco ECM, paying attention to what is described below:
- Alfresco One 5.2 EA release or newer or Alfresco Community Edition 201611 EA release or newer has to be used.
- It is not required (but admitted) to install Alfresco Share. By default, Alfresco Share is installed using the wizard so you can leave it.
- Alfresco Search Services or Alfresco Solr has to be installed, if you require to execute searches into the repository. By default, Alfresco Solr is installed using the wizard and we suggest to leave it.
The detailed description of the installation of Alfresco ECM is out of the scope of this tutorial, considering that the official documentation is complete for various Operating Systems (Linux and Windows based). If you need support on the Alfresco standard installation, please refer to the Community Portal dedicated to the Alfresco ECM.
Using the Alfresco ADF v1.1.0 LA, if both Activiti BPM and Alfresco ECM are used, is requested to have the same credentials for the two systems. With “same credentials” we mean the same users available in Activiti and Alfresco, with the same username and password. For this purpose, we suggest to create a new user with Administrator’s permits intoAlfresco with username
admin@app.activiti.comandadminas password (the default Administrator credentials in Activiti).
1.2.2. Enabling CORS on Alfresco ECM
Now that Alfresco is up and running, we need to tell to the server to accept requests coming from the ADF application. The future ADF application will be installed on a different web server and by definition, it will be considered another domain. This can be done by enabling CORS, not admitted by default.
To enable CORS in Alfresco, please follow the steps described below.
- Download the enablecors-1.0.jar from the Alfresco Nexus Repository. Below is described the link.
https://artifacts.alfresco.com/nexus/service/local/repositories/releases/content/org/alfresco/enable...
- Save the enablecors-1.0.jar file in the $ALF_HOME/modules/platform folder.
Please note that, by default, the CORS filter will allow any origin. This setup should be developed differently in a production environment, according with the best practices in terms of security over internet.
1.2.3. Installing REST API Explorer (Optional)
Even though other setup wouldn't be required, the Alfresco REST API Explorer could be evaluated to be installed, especially if you are defining a development environment. The Alfresco REST API Explorer gives you an interactive documentation for the Alfresco REST API, through the installation of a simple web application. To make it extremely simple, we will deploy the REST API Explorer directly into the Alfresco’s servlet container (by default Tomcat).
To install the Alfresco REST API Explorer please follow the steps described below.
- Download the api-explorer-1.4.war from the Alfresco Nexus Repository. Below is described the link.
https://artifacts.alfresco.com/nexus/service/local/repositories/releases/content/org/alfresco/api-ex...
- Save the api-explorer-1.4.war file in the $ALF_HOME/tomcat/webapps folder.
- Restart Alfresco. You’ll be able to reach the REST API Explorer at the link below.
http://<alfresco_ip>:<alfresco_port>/api-explorer-1.4/
Want to see how the Alfresco REST API Explorer looks like? You can have a preview at the link below.
https://api-explorer.alfresco.com/api-explorer/
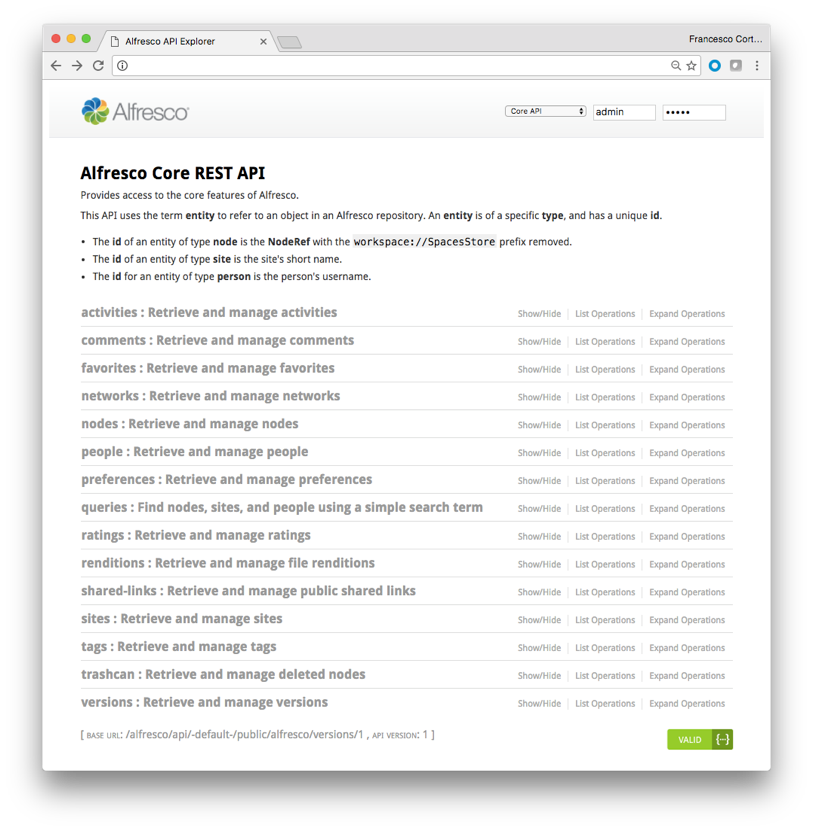
Fig.2 - Alfresco REST API Explorer
2. Creating the application with ADF
In this task, we are going to create your Angular 2 application on top of the service layer composed by Activiti BPM, Alfresco ECM or both. From an architectural point of view, the application created with Alfresco ADF is a front-end layer, completely decoupled from the back-end layer. The front-end layer is defined as an AngularJs application, as represented in the following picture.
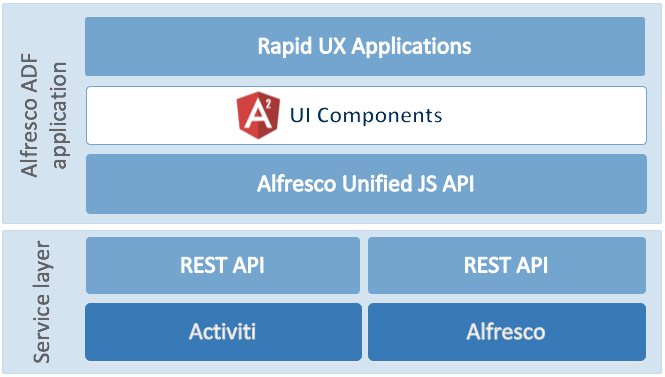
Fig. 3 - Overview of the architecture of an Alfresco ADF application
In the following sections we are going to see how to create a brand new application with Alfresco ADF, assuming an up and running service layer based on Activiti BPM and Alfresco ECM. To reach the goal, we are going to split the whole task as described below:
2.1. Checking the prerequisites (Node.js). In this task you are going to be sure that you have installed all the required software and done all the necessary configurations into your environment.
2.2. Installing Yeoman and the Alfresco App Generator. In this task you are going to set up all it is requested to create your first application with Alfresco ADF.
2.3. Generating your first Alfresco ADF application. In this task you are going to create your first application with Alfresco ADF.
Below you can find a “step by step” description of each task, very straightforward also if you are not extremely familiar with these technologies.
2.1. Checking the prerequisites (Node.js)
In this task you are going to check all the requested software with the right versions and configurations. The prerequisites are mainly about the availability of Node.js JavaScript runtime built, together with its package ecosystem named npm.
Alfresco ADF supports Node.js 6.9.x as official long term supported version, but it is compliance with 7.x versions too. To check which version is installed into your environment, you can run the command below into a terminal (valid for Linux and Windows based Operating Systems).
node -v
To install Node.js into your environment (and npm as a consequence) you can follow the various guides and tutorials over the web. Please take a look at the link here, for further details about the available distributions and support for its installation.
2.2. Installing Yeoman and the Alfresco App Generator
Now that your environment is correctly checked, it’s time to install the Yeoman scaffolder generator and the Alfresco App Generator. To complete this task, simply run the commands below into a terminal (valid for Linux and Windows based Operating Systems). Please be sure to execute the commands with administrator permits (in Linux using the sudo prefix to all the commands).
npm install -g yo
npm install -g generator-alfresco-adf-app
For further details about the Alfresco App Generator and contribution to the project, you can check the GitHub project available as Open Source.
2.3. Generating your first Alfresco ADF application
Once your environment is correctly set up, it’s time create the Alfresco ADF application. Creating your first application with Alfresco ADF is very straightforward following the commands described below.
- Open a terminal and move to a folder where you want to create your project.
- Run the command below to start the Alfresco ADF App Generator wizard.
yo alfresco-adf-app
During the execution, some questions will be asked to correctly create the application. Below a screenshot showing the questions as an example.
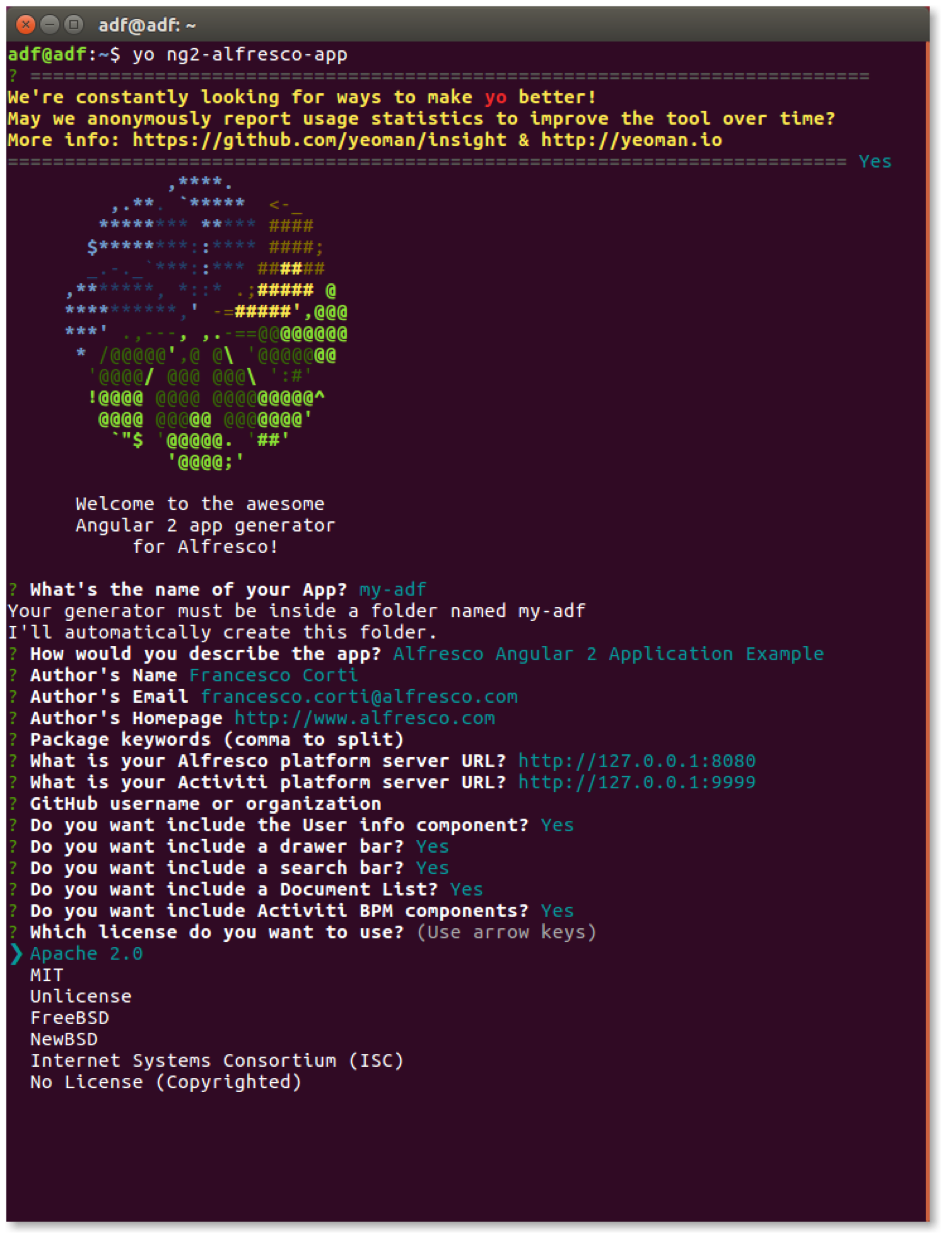
Fig. 4 - Alfresco App Generator wizard.
Once all the questions will be fully completed, a new folder appears, named with the same name of your application (in this case my-adf). The folder represents the source code of your new project created with Alfresco ADF.
From now on, your project is defined in its initial (but working) version so you can: move it into another destination, start developing and customising it, commit the source code into your preferred repository.
3. Running and using the application
Now that your Alfresco ADF application has been created, in this task we are going to see how to run your application for the very first time and start using it. Also in this case, everything is very straightforward following the commands described below.
- Open a terminal and move to the folder representing your brand new application (in this example
my-adf).
- Run the command below to install all the project dependencies. Please note that this command is going to download some resources from the web, so it will require some time to be completed.
npm install
- Run the command below to launch the application and make it available.
npm start
Please note that some warning messages could appear in your terminal. In any case, they don’t affect the success of the launch.
- Once the application is up and running, it will be available by default at the url
http://localhost:3000. Open a browser, access to the login page and remember to use valid credentials for Activiti BPM and Alfresco ECM (for this purpose we suggest to create a new user with Administrator’s permits into Alfresco with usernameadmin@app.activiti.comandadminas password).
Below the login page that will appear into the browser, at your first access.
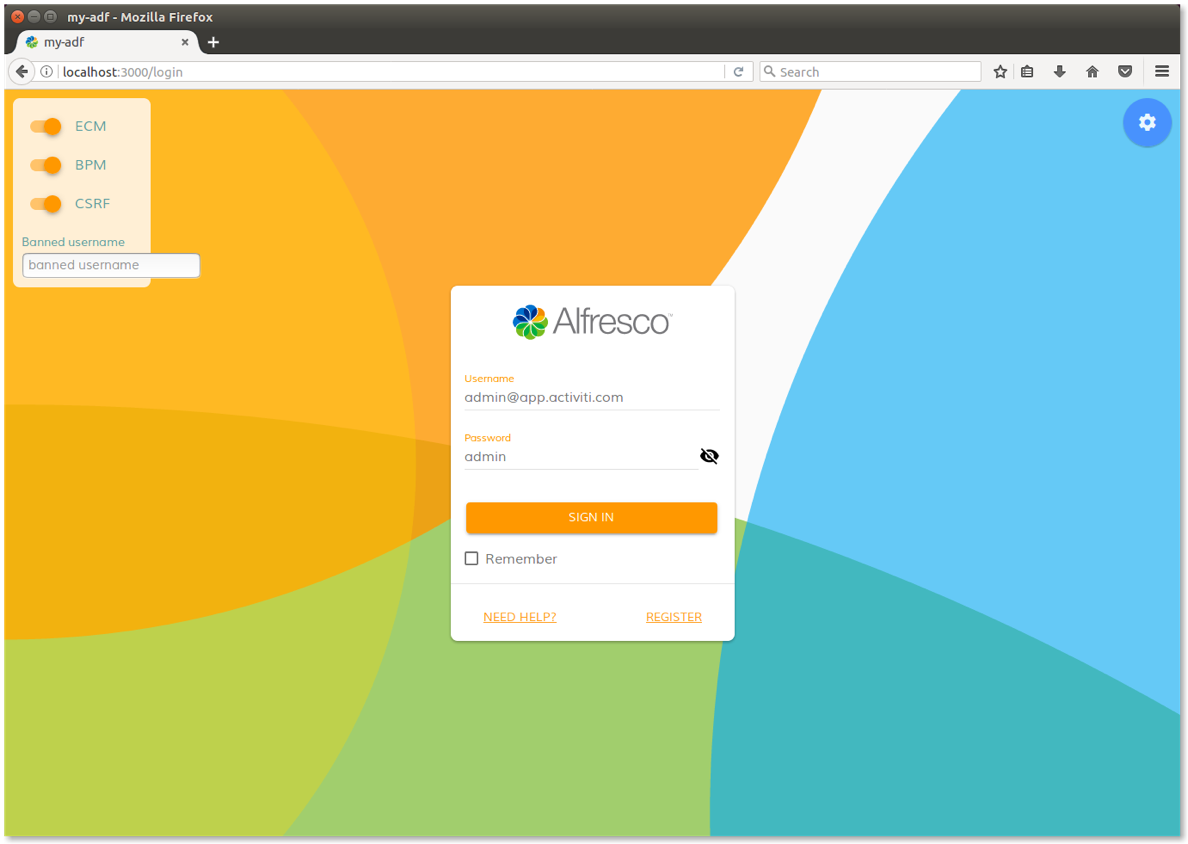
Fig. 5 - Login form for your first application using Alfresco ADF.
Once you login with success, the home page below will be shown into your browser.
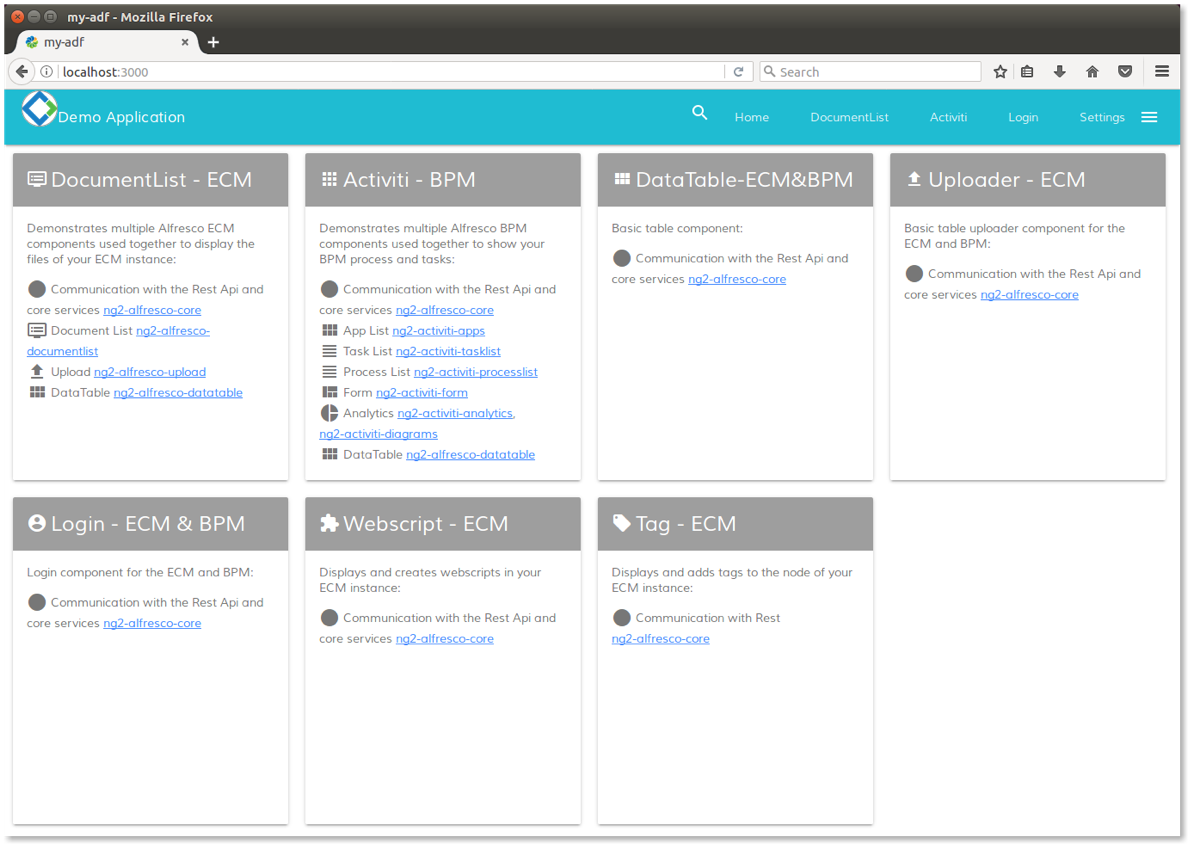
Fig. 6 - Home page of your first application using Alfresco ADF.
Please let us know for any issue or problem, requesting for support into the Community Portal dedicated to the Alfresco ADF or chatting into the Gitter space dedicated to the Alfresco Angular 2 components.
Disclaimer
All the content available in this tutorial has been developed and tested using Alfresco ADF v1.1.0 LA release. Below the full list of platforms, languages, frameworks and tools used here.
- Linux Ubuntu 16.04.01 LTS as Operating System.
- Activiti Enterprise Edition 1.5.2.1 release for Linux (running on port 9999).
- Alfresco Community Edition 201612 GA release for Linux (running on port 8080).
- Node.js version 6.9.4.
Each variation to the listed versions and tools could affect the success of the tutorial, even if the involved technologies and tasks have been defined to be as more general as possible, not related to any specific context or platform. Please let us know for any issue or problem, requesting for support into the Community Portal dedicated to the Alfresco ADF or to the Gitter space dedicated to the Alfresco Angular 2 components.
Conclusion
In this tutorial we saw how to create your first responsive application from scratch, using the Alfresco Application Development Framework (named also Alfresco ADF). The Alfresco ADF is provided by Alfresco as Open Source, to build custom applications on top of the Activiti BPM Engine and Alfresco ECM Repository. For further details about the Alfresco ADF, please refer to the alfresco-ng2-components GitHub Project and take a look to the Alfresco Catalog, with a friendly (and technical) overview of all the available components. For requests of support, questions and feedback, don’t forget to participate to the Community of Developers dedicated to the ADF or to the Gitter space dedicated to the Alfresco Angular 2 components.
- « Previous
-
- 1
- 2
- Next »
You must be a registered user to add a comment. If you've already registered, sign in. Otherwise, register and sign in.
- Alfresco Community Edition 25.3 Release Notes in Alfresco Blog
- Alfresco Developer Resources in Alfresco Blog
- September 2025 - Alfresco Customer Newsletter in Alfresco Blog
- TTL #171 recording - Moving from Share to ADF in Alfresco Blog
- Highlights from the Alfresco Vegas Hack-a-thon 2025 in Alfresco Blog
